appear and GDS and OTA sites as well as . Each Room Type you have set up in Room Types will appear in this listand on your AirBnB listing. Before you upload your images, it is important to prepare them to meet size requirements and edit for best presentation. |
|
Prepare your images
Image style: You can use any image and, In some cases, properties elect to make a collage of images. Collages can be used on your website. However, collage images are NOT allowed on GDS and OTA sites. Image file format: Image files must be in .jpg format.Size requirements: Images must adhere to the minimum and maximum pixel size, noted next to each image, or they will not properly display properly. All of the main images must be 300 x 300 min and 480 x 480 max . Use an image editor to resize your image, save as a .jpg. Tip: making all images the same size will insure best viewing. All thumbnails need to conform to 100 x 100 min and 200 x 200 max.
BookingCenter image upload requirements.The size of the image is very important and must meet size requirements. Before you upload any images, please prepare your images according to these guidelines. - You can upload up to 20 images per Room Type. (A maximum of 5 will display on the Booking Engine)
- Only image files (.jpg, .gif, .png) are allowed
- Image Size: Min: 600 x 300. Any file over 1080 x 1080 will be automatically resized.
- Max Image Size is 3MB. Images larger than this will be rejected.
- Sort Order: The sort order determines the order in which the Slideshow displays the images. The Room Type Thumbnail that displays on the "Select Room" page on the Booking Engine must be set at "Sort Order=1". A "Sort Order=1" also defines image you want to see on your 'legacy' Booking Engine (used for the TripAdvisor 'Book Direct' feature) as the 'legacy' Booking Engine show only one image per Type, Item, and Package.
- Slideshow Order: The slideshow will display in the "View Details" Window. You can add up to 5 images to the slideshow. See Booking Engine | View Details and Amenities.
Note: AirBnB Connection Images uploaded to your AirBnB profile (7 Min. and 20 Max.).Note: Airbnb does require a minimum of seven photos. There needs to be at least three that are high quality, at least 1024 x 768. Please contact BookingCenter support if you need assistance with images.*See additional AirBnB requirements NOTE: |
|
To enable the thumbnails to appear on your website go to |
|
| Column |
|---|
. The first image in the Image Slideshow (Sort 1) will display as the Thumbnail image on all BookingEngine Templates and the Legacy Booking Engine(Request Server). Therefore, to see an image display on the BookingEngine, you must have at least one image set to Sort Order=1. Note: This also applies to Package and Inventory Item Images. BookingCenter Booking Engines and ADA Compliance
All BookingCenter Booking Engine Templates are designed with the necessary elements to meet WCAG Guidelines including "Alternative Text" also known as the "ALT Tag" for Images. We have provided an "ALT Text "field for each Room Type Image in MyPMS, but the descriptive text must be entered by you in the "ALT Text" field for each Room Type Image. This means that every Room Type image on your Booking Engine should have descriptive "Alt Text" entered in MyPMS to ensure that your Booking Engine complies with ADA and WCAG standards. See Booking Engine | ADA Compliance *IMPORTANT ADA Compliance: We have provided an "ALT Text "field for each Room Type Image in MyPMS, but the descriptive text must be entered by you in the "Image Description ALT Tag" Field. See below for step-by-step instructions. |
|
width | 250px |
| Panel |
|---|
| borderColor | #559ADE |
|---|
| bgColor | #F0F0F0 |
|---|
| titleColor | #ffffff |
|---|
| borderWidth | 1 |
|---|
| titleBGColor | #559ADE |
|---|
|
|
|
| borderWidth | 1 |
|---|
| | Page Tree |
|---|
| root | Features and Images Tab |
|---|
|
|
| Panel |
|---|
| borderColor | #559ADE |
|---|
| bgColor | #F0F0F0 |
|---|
| titleColor | #ffffff |
|---|
| borderWidth | 1 |
|---|
| titleBGColor | #559ADE |
|---|
| title |
|---|
|
|
|
To Add an Image:
Step 1: To Add or Edit Images: Go to SETUP | FEATURES AND IMAGES | ROOM TYPE IMAGESFirst, select the Room Type and click Load. The Room Type Image list will display with a list of images uploaded for the the Room Type. If there are no images uploaded yet, then the list will be blank. Then, follow the step-by-step instructions below. See screenshots of each step below.
| Section |
|---|
| Column |
|---|
| 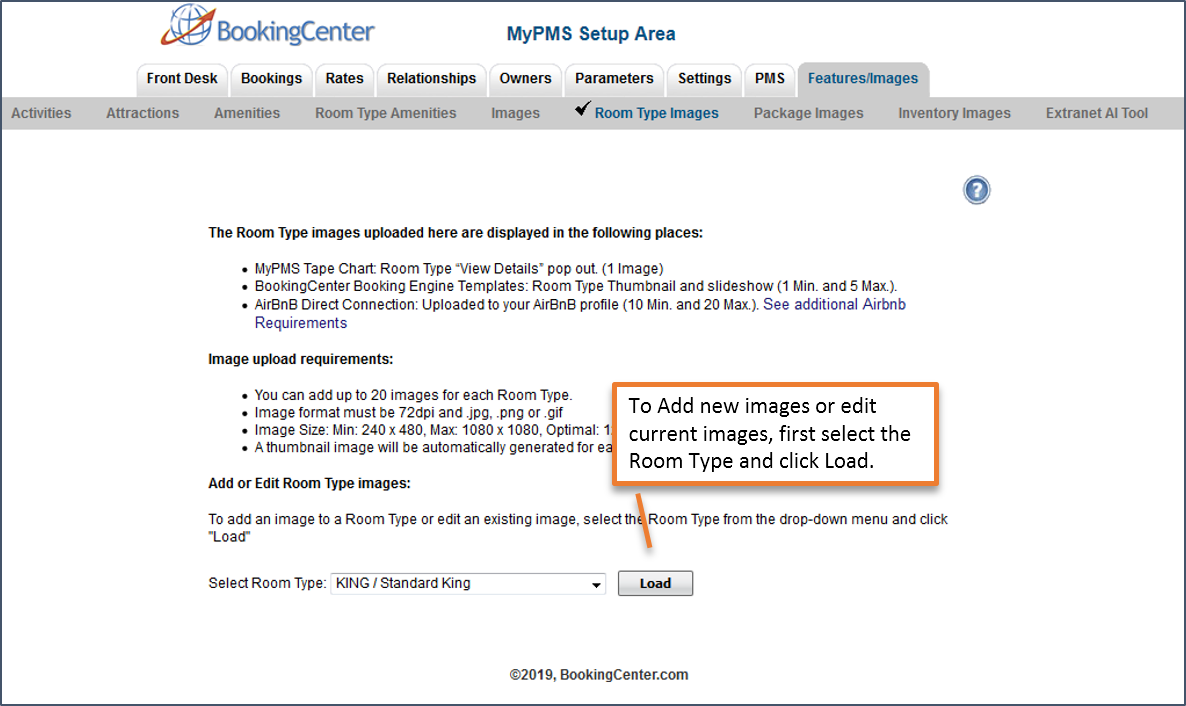 Image Added Image Added
Find the name of the Room Type in the List |
|
- Step 2: Click on the Browse button and a new window will open with your desktop file folders. Locate the image and double click or click open in the window.
- Step 3: The image name will appear next to the Browse button if it uploaded correctly. Then, click Submit.
- Step 4: A message will appear asking to confirm the upload. Click Yes.
- Step 5: The image will appear in the list under the Room Type. Above the image a message will appear stating whether image meets or does not meet required size dimensions. If it does not meet the required dimensions, then edit the image size and upload again.
To Edit or Change an image
- Click Delete to delete the current image and then repeat the steps above.
See screenshots of each step below. Click on each image to enlarge.
| Gallery |
|---|
| columns | 3 |
|---|
| sort | name |
|---|
| title | Add A Room Type Image: Steps 1-5 |
|---|
|
| Column |
|---|
| 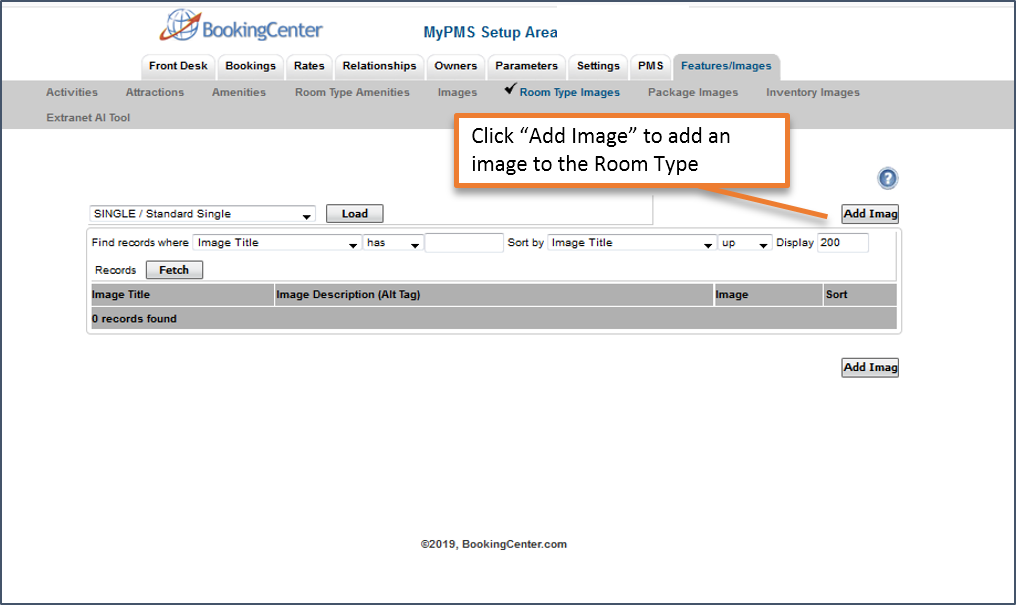 Image Added Image Added
To add a new image, click "Add Image" |
| Column |
|---|
| 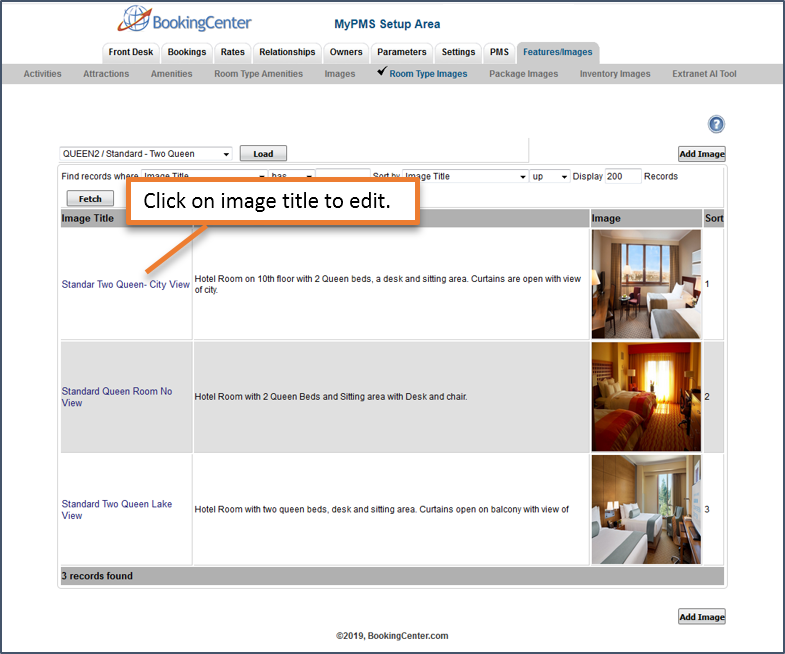 Image Added Image Added
To Edit an image, click on the Image Title |
|
| Section |
|---|
To "Add" or Edit Room Type Image follow these steps:
Once you have selected and loaded a Room Type, the Room Type Image List will display. - To add a new image, click on "Add Image".
- To Edit or Replace an Image: Click on the Image Title
Each Image will need the following information entered. - Image Title. Enter a clear title. Ex: Standard King with View. Remember, search engines to display images based on written descriptions and will display search results more accurately with clean, descriptive text.
- Image Description (ALT Tag) : Enter a description of the image. For example: Hotel Room with one King Bed and a sitting area with desk and chair. Sliding glass door opens to balcony with view of city. *
- Sort Order: The sort order determines the order in which the Slideshow displays the images. The Room Type Thumbnail that displays on the "Select Room" page on the Booking Engine must be set at "Sort Order=1". A "Sort Order=1" also defines image you want to see on your 'legacy' Booking Engine (used for the TripAdvisor 'Book Direct' feature) as the 'legacy' Booking Engine show only one image per Type, Item, and Package.
|
| Section |
|---|
"Add" Room Type Image| Column |
|---|
|
| Panel |
|---|
| borderColor | #fafafa |
|---|
| borderWidth | 1 |
|---|
| title | Click "Add Image" |
|---|
| | Image Added Once you have selected and loaded a Room Type:Click on Add Image. The Add Image screen will display. |
|
| Column |
|---|
|
| Panel |
|---|
| borderColor | #fafafa |
|---|
| borderWidth | 1 |
|---|
| title | Upload Image |
|---|
| 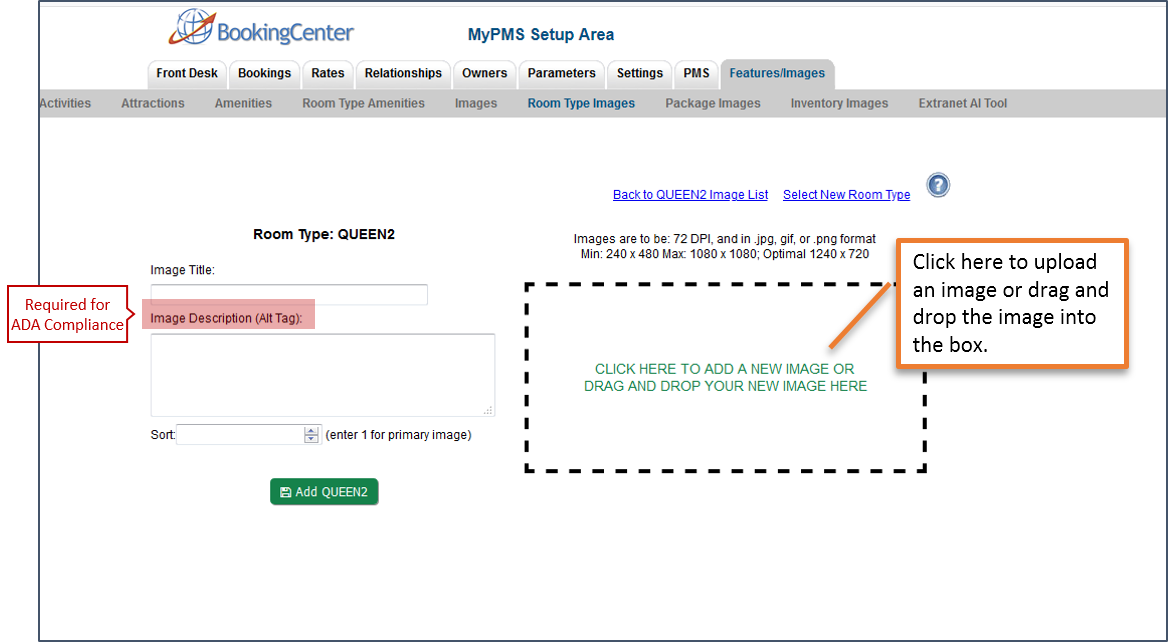 Image Added Image AddedClick on the box to open the upload folder and select the image from your local folder or, drag and drop the image into the box. |
|
| Column |
|---|
|
| Panel |
|---|
| borderColor | #fafafa |
|---|
| borderWidth | 1 |
|---|
| title | Title, Description and Sort |
|---|
| 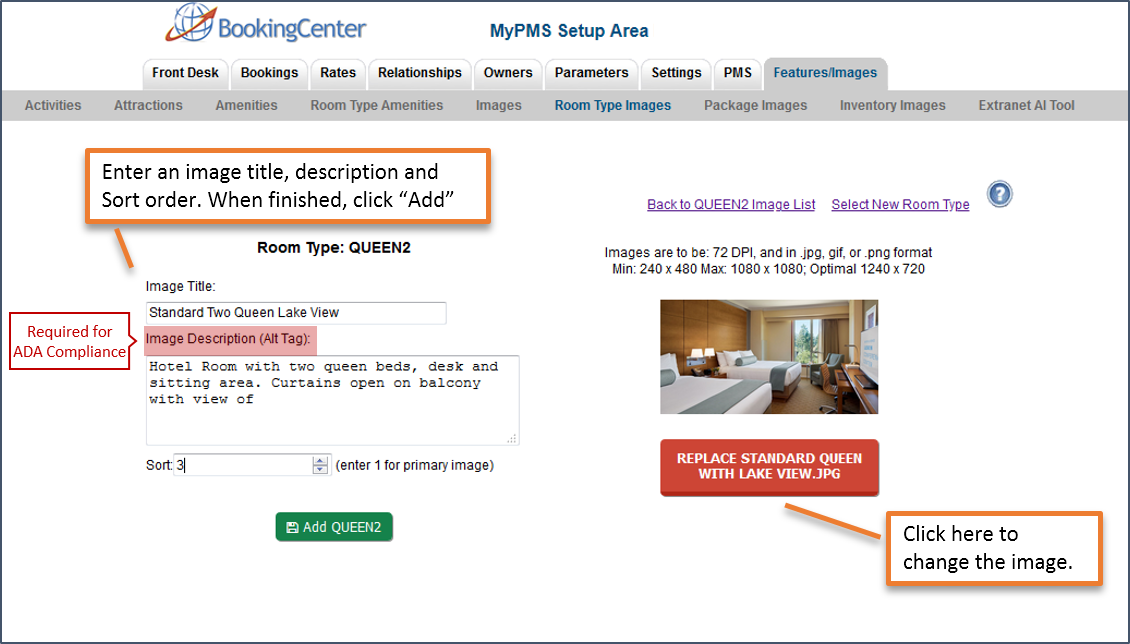 Image Added Image AddedEnter a clear Image Title, Description.andSort Order.The sort order determines the order in which the Slideshow displays the images. The Room Type Thumbnail that displays on the "Select Room" page on the Booking Engine must be set at "Sort Order=1" |
|
|
"Edit" Existing Room Type Image
| Section |
|---|
| Column |
|---|
|
| Panel |
|---|
| borderColor | #fafafa |
|---|
| borderWidth | 1 |
|---|
| title | Open Image Details |
|---|
| | Image Added
A list of images uploaded for the the Room Type. Click on the Image Title to open the Edit screen. |
|
| Column |
|---|
|
| Panel |
|---|
| borderColor | #fafafa |
|---|
| borderWidth | 1 |
|---|
| title | Edit or Replace Image |
|---|
|
 Image Added Image Added
To Edit or Replace an Image: Click on the box to open the upload folder and select the image from your local folder or, drag and drop the image into the box. The uploaded image will display in the Image Box. |
|
| Column |
|---|
|
| Panel |
|---|
| borderColor | #fafafa |
|---|
| borderWidth | 1 |
|---|
| title | Replace or Update Image |
|---|
|  Image Added Image Added
The new image will display. To change the image, click "remove". Click Update to add the image. |
|
|
The uploaded image will display in the Image Box
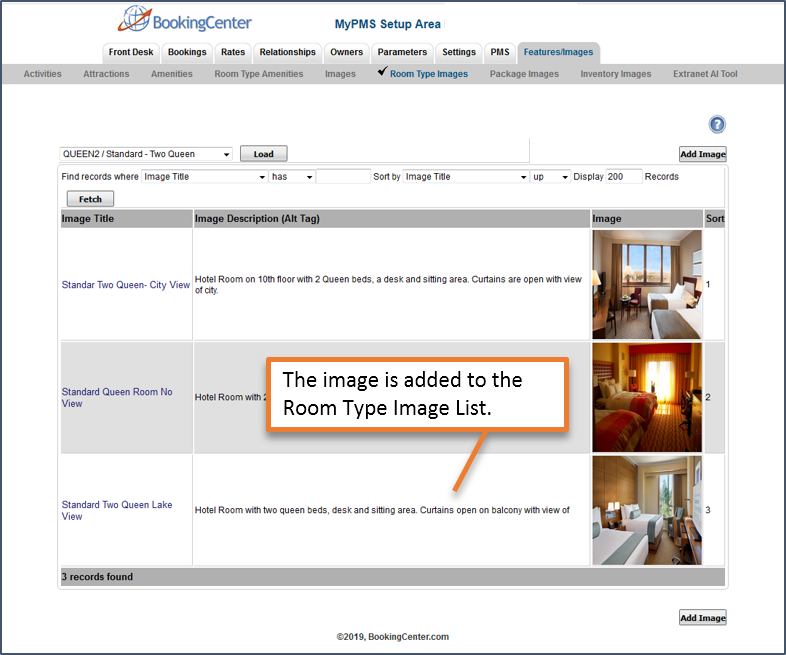 Image Added